
Spring is near and the fight is almost over.
The temperatures are rising and your cluster is slowly breaking apart into the individual lively bees they once were. The job roles are starting to vary from "save the queen" back to cleaning, nursing, wax building, foraging and scouting.
As any worried beekeeper would be, you're probably wondering How are my bees doing right now? and How can I help them?
This can stir up an uneasiness and as soon as the weather breaks into the 50s, I invite you to go check on them.
Second year beekeeping can bring on a whole new set of challenges than the ones you faced last year. The most apparent of them all is supporting your bees through late winter and early spring.
Fluctuating temperatures can bring about timing issues. When to introduce things to your hive is just a crucial as how you introduce them to your hive. Giving spring bees sugar water can be more harmful than good. Feeding them pollen can result in famine. Performing certain Varroa Mite treatments can be ineffective.
This article focuses on the what, when and how to get the greatest start to second year beekeeping. To find out more about the challenges ahead, keep reading.

Table of Contents (Click to Skip Around)
Feeding Dry Pollen (January - February)Early Spring Inspection ASAP (February - April)
- Looking for Signs of Life
- Checking for Your Queen
• Laying Workers
- Feeding Bees in Spring
• The Mountain Camp Sugar Method
- Deciding How to Get New Bees (Optional)
• Finding a Swarm
• Baiting a Swarm
• Splitting a Hive
• Buying a Package
• Buying a Nuc
Mid Spring Inspection (March - June)
- Count Your Varroa Mites
• The Sugar Shake Method
- Perform a Varroa Mite Treatment
• When, How & Why to Use Apivar
- Sugar Water in Spring
- Medicate Your Bees
• Fumagilin-B
• Honey B Healthy
After Frost Date Inspection (March - July)
- Remove Insulation
- Untilt Hive (Optional)
- Reverse Hive Bodies (Optional)
- Remove Ventilation (Optional)
- Change to Screened Bottom Board (Optional)
• Solid Vs Screened Bottom Boards
- Receive New Bees (Optional)
Feeding Dry Pollen (January - February)
Feeding your bees pollen or a pollen substitute like Ultra Bee, MegaBee, or Bee-Pro is an important step to giving your bees the greatest head start into early spring.
While nectar is your bees' primary source for carbohydrates, it is pollen that packs the punch when it comes to your bees' proteins, lipids, sterols, vitamins, minerals and certain carbohydrates. Pollen is absolutely essential for spring bees to get the nutrition they need to create a healthy hive.

According to a study on how your bees take in protein published in the Journal of Insect Physiology, pollen provides your bees with:
- Nutritional reserves to stimulate brood rearing
- Support while resisting pathogens such as Deformed Wing Virus (DWV)
- A longer lifespan
- A more nutritious and higher quantity of worker jelly to help larva grow strong
A different study, from the Mid-Atlantic Apiculture Research and Extension Consortium (MAAREC) notes that, "In colonies with a lack of pollen, brood rearing is delayed until fresh pollen is collected from spring flowers, and these colonies usually emerge from winter with reduced populations." This suggests that pollen is crucial to your bees' diet when feeding bees in spring, or even as early as January. It will give them the best head start to early spring flower blooms and help them increase their population growth quickly.
While you may have used pollen patties to help your bees get through the fall, spring bees call for plain dry pollen or a pollen substitute outside of the hive. The reason for this is so your bees can choose if they want to take the pollen or not. The last thing you want to do is to encourage the bees to produce brood before the hive can handle it. If your queen lays eggs so prolifically that she fills up all the frames in her box with brood, then your bees will be spread thin to try to keep the brood warm. A colony that is spread thin can't cluster to keep themselves warm if there happened to be another cold snap.
Another possible problem with feeding your bees pollen inside the hive while beekeeping in spring is that more bees could be produced than your natural environment could support. This could lead to stress and famine within the hive. If this happens you'd be forced to feed your bees sugar water early in the year to keep up with the demand.
This is why it's so important to let the weather dictate if your bees have access to the pollen outside of their hive rather than placing it directly in their hive during January or February.
Here's a Pro Tip!
The best way to feed your bees pollen, during late winter/early spring, is by leaving a pile of dry pollen or pollen substitute underneath a small rainproof shelter. A rainproof shelter could be as simple as turning a bucket on it's side or under any cover that would keep the pollen from getting wet and caking. Once the pollen has caked, the bees don't seem to want it.
For some creative ideas on pollen feeders check out the video here from Jason Chrisman.
Early Spring Inspection ASAP (February - April)
As soon as your neck of the woods finally gets a break in the weather, it'd be a good idea to get out to the bee yard and check on your bees.
You'll want to wait for a day that doesn't have wind and has temperatures hovering around 55°F (13°C)degrees or above. On a day like that, you should have little to no fear that your brood would die from the cold while inspecting the frames. Even still though, you'll want to be relatively quick about your inspection.
During the early spring there are 4 main activities that you'll be doing:
- Looking for Signs of Life (Click Here)
- Checking for Your Queen (Click Here)
- Feeding Bees in Spring (Click Here)
- Deciding How to Get New Bees (Optional) (Click Here)
Looking for Signs of Life
Going through your first winter as a beekeeper can build up a bit of anxiety. The long cold months can raise questions like, Will my bees survive? Did I do everything I could to prepare them for the winter? Will I have to start over? All of this is uncharted territory for a new beekeeper, but no matter what happens -- learn from it and keep moving on.
When the weather finally breaks, one of the first things you'll be able to determine when inspecting your hives is if your bees have survived the winter or not.
Your bees will likely be in a cluster located at the top center of your hive. This is the area in your hive that collects the most heat.
When you crack open the inner cover you should see them gathered there. If not, it is still possible that they may have moved down just a bit, so take out a frame or two to check if they are there.

If your colony is nowhere to be found, then you may have had a late fall swarm or a dead-out.
A dead-out is a euphemism beekeepers use when their hive has died. The most common culprits are condensation, starvation or from getting too cold. These aren't the only reasons though. As a beekeeper, it would be beneficial for you to learn from what happened and to determine if there is anything you could do to change the outcome for next year. Here is a link to an article that describes how to determine the cause of death of your honey bee colony: How to Autopsy a Honey Bee Colony.
Ideally you want a cluster that is as large or larger than a grapefruit. At this size a colony can maintain enough heat to keep any brood that may be laid warm. If you don't have this many or if it seems like you've lost your bees, drop down to the section in this article titled Deciding How to Get New Bees (Optional) (Click Here). Don't give up, we all lose our bees every now and then.
Checking for Your Queen

Bees can survive without their queen. Especially the fatter bees that the queen produces right before winter hits. These fatter bees have an extended lifespan. While normal bees would live 4 to 6 weeks, these winter bees can last 4 to 6 months instead.
Unfortunately, despite your bees' best efforts, your queen will eventually die. On average, queens can live between two to three years and sometimes that lifespan happens to end during winter.
Terrible timing like this can mean that your beehive can't save themselves. Normally the nurse bees would choose one of the larva that the queen recently laid to become the next queen. In the winter though, there isn't many (if any) larva to choose from.
To figure out if she is still around, you'll have to go through a few frames to try to find her.
If you find your queen while inspecting your hive, fantastic! If not, you have a few different options. You can order a new queen; take a frame of brood from another colony; combine hives; or wait a week or two when the weather is nice again and look a second time. To learn more on all your options you can visit our other article called: Where Should I Get My Bees?
One good sign that your queen has survived is that you see brood being laid. Although that is not a 100% confirmation that she is in the hive. Sometimes, you can have laying workers and you'll have to know the difference.
Laying Workers
Sometimes worker bees can be "promoted" to lay brood eggs when the queen dies. This is more or less a last ditch effort for the genetics of the hive to survive and is not a long term solution. In fact, the "promoted" worker bees can only lay male drone honey bees as a way to help the honey bee population at large -- they can't save the hive.
The tell-tale sign that you have laying worker bees is that you'll see multiple eggs in each cell. Knowing this can help you determine if your hive needs a new queen.

Here's a Pro Tip!

Rusty, a Master Beekeeper who created an information hub called Honey Bee Suite has a great article on How to Fix a Laying Worker Hive.
Here's a quick summary of her findings. She says that the way to fix a laying queen issue is by taking frames of freshly laid worker brood (not drone brood) from a queen-right hive and putting them into the queenless hive. Over time this releases open brood pheromones that convince the laying workers to stop laying eggs. They then convert one of the upcapped brood cells into a supersedure queen cell. Once you have this happen, the hive is now ready to accept a new queen whether you let them make their own or buy one.
Feeding Bees in Spring
Even though the early spring inspection is supposed to be quick, be sure not to miss this crucial step.
While you're lifting frames to check for the queen and estimating how large of a cluster you still have, check out your bee's food stores.
March and April are notorious for having unpredictable dearths that can starve a hive. Many hives still have to rely on the honey they have stored away. So, unless you left enough honey on your hive, you might find yourself needing to give them a little extra food.

To check their food stores, you can simply look to see if the food you placed in their hive when you were preparing for winter is still there. Another way to quickly check for food is to look at the tops of their frames to see if there is any capped honey (see picture).
If you end up determining that your hive does not have enough food, you'll need to add some. We suggest using the Mountain Camp Sugar Method for feeding bees in spring.
The Mountain Camp Sugar Method

For late winter/early spring feeding, we recommend The Mountain Camp Sugar Method. This method uses dry sugar as a way to feed your bees. Dry sugar is an excellent bee food for the winter months and early spring because it doesn't freeze up. No matter how cold it gets the bees will be able to chip away at these tiny granules and feed on them.
Another benefit of using dry sugar is that it is able to pull moisture out of the air and soak it up like a sponge. Moisture can be an absolute monster when it comes to whether or not your bees survive winter.
Moisture has a tendency to gather under your inner cover and turn into freezing cold water. Once this water has gathered, it drips down on to the cluster below. Much like humans can suffer hypothermia from getting wet in the cold, the bees can't handle being wet in the winter's cold and unforgiving environment either.
Here's a Pro Tip!
Here's a quick step by step informative video from Kamon Reynolds - Tennessee's Bees on how he does the Mountain Camp Sugar Method.
- First he cracks open the hive and inner cover
- Then places some newspaper down directly on the top frames (some people spray the newspaper with a little sugar water to keep it weighed down and to help the bees chew through it)
- Next, he slowly pours a mountain of dry sugar on top of the newspaper
- Spreads the sugar to form an even layer over top of the newspaper
- Then he sprays it with a little water and closes up the hive
Deciding How to Get New Bees (Optional)
No beekeeper wants to find themselves in a situation where they have to order new bees, but it happens.
If you lost your bees over the winter, it's best to figure out how you're going to get your spring bees this year as soon as possible. Many apiaries will start taking orders in January and February.
If you're going to place an order, call as soon as you can. Apiaries will only have a limited stock and it's first come first serve.
After you've placed your order, they'll likely ask you when your frost date is. The apiary will then wait to deliver your bees after they've built up their populations a bit and the frost date has passed. This gives your bees the best and safest chance of survival.
There are 5 main ways to get a hold of a new hive:
- Finding a Swarm (Click Here)
- Baiting a Swarm (Click Here)
- Splitting a Hive (Click Here)
- Buying a Package (Click Here)
- Buying a Nuc (Click Here)
Finding a Swarm

The hardest part about finding a swarm is actually finding the swarm. Once you've found them though, it's really not too difficult to retrieve them, take them home, and install them into your own beehive.
Bees that don't have a permanent home are more docile and gentle than any other kind. They generally aren't aggressive because they don't have to protect their honey. Although you probably won't get stung, we would still recommend wearing a bee suit to calm your nerves if this is your first time.
To find out why bees swarm, how to find a swarm, and how to catch it keep reading about this in our full length article: Where Should I Get My Bees? - Finding a Swarm (Click Here).
Baiting a Swarm
Baiting a swarm is very similar to finding a swarm. It can be a little more difficult to do, costs a little more in materials, and takes just as much luck to result in obtaining a swarm. After you're all set up though, it takes very little effort, you don't have to leave your property to catch a swarm, your bait box should last for years, it's passive & ongoing throughout the swarming months, and could catch multiple swarms given enough time.

For more on where to bait a swarm, how to make a bait box and the kinds of baits you can use read more at: Where Should I Get My Bees? - Baiting a Swarm (Click Here).
Splitting a Hive

Most beekeeping experts advise new beekeepers to get two beehives instead of just one.
Among many benefits, having two hives allows you to have some hive insurance. If one hive dies, you're able to split your other hive into two colonies.
You can also split a hive from someone you know who has a hive. This option can be free if you know a beekeeper who is willing to give you some eggs to start your own. Most of us aren't so lucky though.
Read more on how to split 1 hive into 3 at: Where Should I Get My Bees? - Splitting a Hive (Click Here).
Buying a Package
This is the first option on the list that you'd have to purchase.
Ordering a package of bees, should ensure that you'll receive your spring bees this year (unless the apiary you choose fails to fulfill the order).
A package of bees usually comes in a wooden box that is about the size of a shoe box. This box holds 3 pounds of worker bees, a queen in a queen cage, and a can of sugar syrup for the bees to eat while traveling by mail or car.
Where Should I Get My Bees? - Buying a Package (Click Here) will explain to you what you can expect and how to install a package.

Buying a Nuc

The last option on the list is to purchase something called a Nuc. This is the least risky way of obtaining your bees and is what we recommend for all beekeepers to do.
Nucs, short for Nucleus, come with 5 drawn out frames that are full of brood, a queen, and a few pounds of bees.
Buying a Nuc means that you're buying an already established miniature hive.
The most common way that Nucs are sold are in 5 frame increments (see picture).
To read more about what you'll receive in a 5 frame Nuc, how to install one and more, check out the whole article at: Where Should I Get My Bees? - Buying a Nuc (Click Here).
Mid Spring Inspection (March - June)
Mid spring is a time when it's warm enough during the days that you can open the hive and do a thorough inspection. The temperatures outside are in or above the mid 50s°F (about 10°C) during the day and no longer dip below 23°F (-5°C) degrees at night.
At this time of year, you'll easily be able to see your busy bees hustling around the hive. The flowers are flowing and there's plenty of pollen and nectar ripe for the taking. It's warm out, but there is still a fear of the occasional cold snap or early nectar dearth.
If you're not sure if you're in mid spring yet, you can always check out wunderground.com/history (Click Here) to see what the temperatures were like around this time last year in your area. Another option is to check the current year's Farmer's Almanac or Google for a semi-accurate prediction.
If you are in mid spring and aren't just in the middle of an early heat wave, then there are four important aspects to do at this time of year:
- Count Your Varroa Mites (Click Here)
- Perform a Varroa Mite Treatment (Click Here)
- Sugar Water in Spring (Click Here)
- Medicate Your Bees (Click Here)
Count Your Varroa Mites
Varroa Mites have become the bane of beekeeping. Like ticks on a dog, they latch onto your bees until they find their next victim.
Without a doubt your bees need a good dose of Varroa Mite treatment in mid winter as well as in early to mid spring. Although in mid winter you're limited to doing a 'blind' treatment (no count) because it'd be a bad idea to open up the hive, the early to mid spring time period is a little different. Beekeeping in spring, where the daily temperatures are well over 50°F (10°C) degrees, means you can make time to do a Varroa Mite count and treatment without harming the bees.
Many beekeepers wonder, Why not skip this step? Why should I bother to do a Mite Count if I know my bees need a treatment?

These are good questions on the surface, but mite counts can give you long term data for your bees. Doing a mite count before eliminating these little suckers can help you know which hive is least vulnerable to them. Many beekeepers will intentionally breed and split hives from queens that produce bees that are the most resistant to mites.
When your bees are resistant to mites it means that they have developed a habit of cleaning their sisters by, most often, biting off the legs of the Varroa Mites. This grooming behavior can be found in certain colonies and should be rewarded with passing on their genes to the next generation.
If after doing a mite count you find that one beehive has significantly less Varroa Mites than another, you'll want to keep that in mind in the future.
Then after noting the count, go ahead and treat them.
The Sugar Shake Method
One incredibly affordable method of getting an accurate count of Varroa Mites is to use the Sugar Shake Method. In this technique you'll use powdered sugar to separate the Varroa from their victims. The powdered sugar is nearly harmless to the bees, but will find it's way into the knees/joints of the Varroa Mites. Once their joints are locked up, the Varroa Mites fall off the bees. This gives you an opportunity to count them and get a good idea of how many mites you have for every 300 bees.
Some experienced beekeepers would rather use rubbing alcohol or starting fluid to remove the little varmints. These two options give you a more accurate count, but will kill the 300 or so bees that you're testing. Beekeepers who use this method see the 300 bees as insignificant compared to the tens of thousands they will have saved through accurate testing. It's up to you to decide what you'd like to use.
Here's a Pro Tip!
This helpful video from Louisiana State University's AgCenter demonstrates the way to do a Mite Count using the Sugar Shake Method.
Take the number of mites you counted and divide it by 300, then multiply that by 100. This will equal the percentage of mites you have in your beehive. If it is more than 4%, you have a mite problem and will need to take care of it.
If you find that your mite count is high, read on to the next section to see some ways to fix the issue.
Perform a Varroa Mite Treatment
It's likely the last time you did a Varroa Mite treatment was back in January. In that mid winter mite treatment you weren't able to open the hive, so you were limited to doing a blind (no count) treatment using the Oxalic Acid Vaporization (OAV) method. Although the OAV method is phenomenal for January when there is no brood in the cells and you can't open the hive, spring time offers quite a few more treatment options. To learn more about the OAV treatment method and how to do it you can check out our article called: Winter Beekeeping: Treating Varroa Mites & Feeding Bees In Winter (Click Here).
Although OAV is great for January, when it comes to the early to mid spring treatment we'd recommend using Apivar. Feel free to do your own research on what would work best for you though.
Why, When & How to Use Apivar
Apivar is an extremely versatile and effective treatment against Varroa Mites. Listed below are some of the many benefits.
- Apivar is great for early spring because it isn't temperature sensitive. If it gets too cold or too hot it doesn't matter. The only caveat to this is that the treatment only works if your bees can come into physical contact with the strips first. This is why it's not so great in winter when your bees are in a constant cluster
- While Mite Away Quick Strips (MAQS) can pause your queen's rearing cycle and has been known (in rare occasions) to even kill your queen, Apivar won't mess with her brood rearing at all. This is very important for the spring build up
- You likely just used OAV a few months ago and alternating between medicines can prevent Varroa Mites from becoming resistant to the treatments
- The 42 days of Apivar are far more effective overall than the harsh 7 day period of a MAQS treatment
- Apivar is very safe for the bees, brood and humans to use.
- Apivar is user friendly while MAQS can cause problems if you don't apply it right
Here's a Pro Tip!
The Honey Bee Health Coalition strives to bring beekeepers, growers, researchers, government agencies, and many other groups into a unified conversation on improving the health of honey bees.
In this video, they cover how and when to use Apivar to help control the Varroa Mite population.
Sugar Water in Spring
If you're reading this article, you likely fed your bees sugar water at some point last year. If you didn't then I'd point you over towards The Ultimate Guide to Feeding Bees Sugar Water (How to Make it & More).
Most apiaries deliver their bees after the last frost date, so last year when you got your bees it was probably warm enough that you didn't have to worry about your sugar water freezing. One difference this time around is that while second year beekeeping you have to wait to feed them sugar water until the temperatures won't dip below 23°F (-5°C) degrees.

As temperatures get warmer throughout the spring, your night time temperatures will eventually stay above 23°F (-5°C) degrees. Even though the temperatures are below 32°F (0°C), the sugar syrup won't freeze because the sugar prevents it from doing so. It's more or less like a sugary slushy until it hits 22°F(-5.5°C) degrees. Once this temperature is met, the syrup turns into a solid block of ice. An ice block is useless and dangerous to your hive. The action of freezing water expands the liquid and can break the jar it's contained in.
Additionally, you wouldn't want to put sugar water on your hive in the cold because your hive can also end up with more moisture in the air -- which is exactly the opposite of what you want to do when temperatures are still cold. Hypothermia is a real threat to bees.
Another thing to keep in mind is that the bees won't eat the sugar water unless temperatures are above 50°F (10°C). So it's not a good idea until your area's daytime highs are predictively over 50°F (10°C) anyways.
You can continue to feed your bees until they naturally stop taking it in* or you are ready to add a honey super to your hive. At this time, the bees are pollinating the plenty of other nectar choices that are available to them.
*If you bought or caught a new colony this year, you'll want to continue feeding them syrup for most of the year. They have a lot of comb to draw out and until they finish, they'll need as much sugar syrup as they can get.
Here's a Pro Tip!
Sugar water is an incredibly simple syrup to make. Depending on the time of year, beekeepers will switch back and forth between feeding their bees a thin syrup (1:1) and a thick syrup (2:1). Many beekeepers like Frederick Dunn, the creator of a highly educational YouTube channel, believe that giving their bees a thin ratio of 1 part water to 1 part sugar (by weight) is the most beneficial for bees to build honeycomb with.
As bees make more honeycomb, the queen can then fill the cells with eggs. This increase in worker bees will snowball (exponentially grow) their wax building efforts because one of the first roles that young worker bees have is to build wax. At this young age the worker bees are at their peak when it comes to the amount of wax comb they can build. This population boom of wax builders eases the high demand for more real estate by drawing out more frames of comb.
Interestingly enough, bees seem to know how to capitalize on periods of high nectar flow. This is the exact reason why most swarms happen in the spring time. It's because there is plenty of nectar to help give a new colony a head start to building their new home.
Once you've started feeding your hive to help them produce wax, it might be a good idea to untilt your hive. Bees use gravity to direct their comb building. If your hive is tilted, it might not produce the most even wax. This is just an option, if you don't untilt your hive now, you can wait until after the last frost when there is on average less rain anyways. Read more about this below in the section called: Untilt Hive (Optional) (Click Here)
Medicate Your Bees
Most medications that you should give your bees are slipped into their sugar water. This is the main reason why you're waiting until mid spring to give it to them.
Fumagilin-B
Use Fumagilin-B in your first feeding. This is a medication for one of the most common diseases that spring bees get, Nosema.

Nosema is a sickness, much like dysentery to humans, that bees get when they have parasites in their digestive tract. When your bees have it, you'll notice streaks of yellow and brown on the outside of the hive.
This medication should be proactive, not reactive.
While medicating, follow the instructions on the bottle. Most beekeepers add Fumagilin-B to the first sugar syrups of the year. Some beekeepers go as far as to spray the medicated syrup directly on the bees because, like humans, the bees will avoid taking their meds.
Honey B Healthy
Another helpful medication you can look into is Honey B Healthy.
This nectar substitute is composed of the right blend of lemongrass and spearmint essential oils. These oils are said to help bees in many ways. Spearmint is something that Varroa Mites tend to avoid while lemongrass attracts bees to it.
Honey B Healthy mentions how their solution can help calm honey bees when used as a spray. They also say that it can help your bees build wax on plastic foundation. This would encourage your bees to draw out straight and even foundations.

After Frost Date Inspection (March - July)
The Last Frost Date of your neck of the woods should be circled in red on your calendar.
Normally this frost date is seen as the day that you can plant your vegetables without fear of losing them to cold weather. For beekeepers this means the long hard winter is over and we can finally take a well deserved deep sigh of relief.
Once your area has hit this date there are a number of tasks that you can do to help out your bees.

To figure out your last frost date, you can use this map to get an average date. You can also find it in the current year's Farmer's Almanac or just Google it.
The tasks you're waiting to do after the last frost include:
- Remove Insulation (Click Here)
- Untilt Hive (Optional) (Click Here)
- Reverse Hive Bodies (Optional) (Click Here)
- Remove Ventilation (Optional) (Click Here)
- Change to Screened Bottom Board (Optional) (Click Here)
- Receive New Bees (Optional) (Click Here)
Remove Insulation

When your hives are insulated, whether it be tar paper or Styrofoam, it's much like they're wearing a winter coat. These coats are great for the winter, but not for warmer weather.
Now that we're well into spring, your hive is ready to shed it's heavy coat and start regulating it's own temperatures.
Leaving on the insulation would be a terrible idea. It's pretty obvious when a colony is overheating. They'll either be fanning or bearding outside of their hive.
You'll have a much more productive hive if you take the insulation off once it starts to get warm enough at night after the last frost date.
Untilt Hive (Optional)
Tilting your hive is an important step to do during your winter prep. Like a well built roof and gutter system on a house, tilting your hive keeps the water from puddling on/in the hive. This keeps the moisture level in the hive low.
As we mentioned earlier, bees can be susceptible to hypothermia, so we need to keep moisture out of the hive whenever possible.
Some beekeepers keep their hives tilted all year long, especially if they live in an area that rains constantly.
The reason you might untilt your hive is because your bees are building more comb during the spring and summer. Bees use gravity to direct their comb building. If your hive is tilted, it might not produce the most straight and even wax.

Reverse Hive Bodies (Optional)
During the winter months, the bees normally chase the heat and end up in the top deep box of the hive. This can leave the lower deep mostly empty. Since bees work their way up a hive all summer long, many beekeepers recommend that you reverse your bee boxes to start them at the bottom of the hive.
Doing this means taking both bee boxes off of your bottom board and making your top box your lower box and vice versa.
Here's a Pro Tip!
Here's a video of how Kamon Reynolds - Tennessee's Bees reverses hive bodies. He notes that most of the time you'll find yourself with a very healthy looking bottom deep box. In these cases, there is no need to reverse hive bodies. It's only about 25% of the time that he finds himself having to reverse them.
While the boxes are off you can clean and scrape the bottom board or change the board out for the summer time screened bottom boards. We'll mention more about screened bottom boards below (Click Here).
The last thing you might want to do while the boxes are off is to flip your Entrance Reducer to the larger opening, ready for the summer months.
Remove Ventilation (Optional)
This step is optional because some beekeepers like ventilation in their hives all year long. Others, don't. When it comes to ventilation their are two schools of thought.
1. The Beekeeper's Perspective
This school of thought come from the fact that beekeepers have taken their bees out of the natural habitat that they would have chosen for themselves. Because of this, people who come from this perspective believe that they have to help the bees overcome the manmade problems that their manmade boxes have created.
To help the bees out, these beekeepers will add ventilation through top entrances or screened bottom boards.

2. The Bee's Perspective
The second school of thought comes from trying to replicate what a bee would choose as it's natural habitat. In this scenario you can look at the kind of places that colonies like to choose as their own homes.
Their choices will differ depending on the natural climate around them.
More often than not, they choose to live inside the hollow of a tree. This provides maximum climate control and protection.
If a colony chooses to move into a hollow, they will walk around the entire cavity and fill every hole with propolis or comb to keep the wind flow down.
From this point of view it would make sense to close up all of the ventilation through using solid bottom boards and entrance reducers. This would allow the bees to regulate their own climates within their own hives.
For more on these two perspectives and where bees like to live, you can read our full article: 10 Factors When Considering Where to Place a Beehive (Click Here).
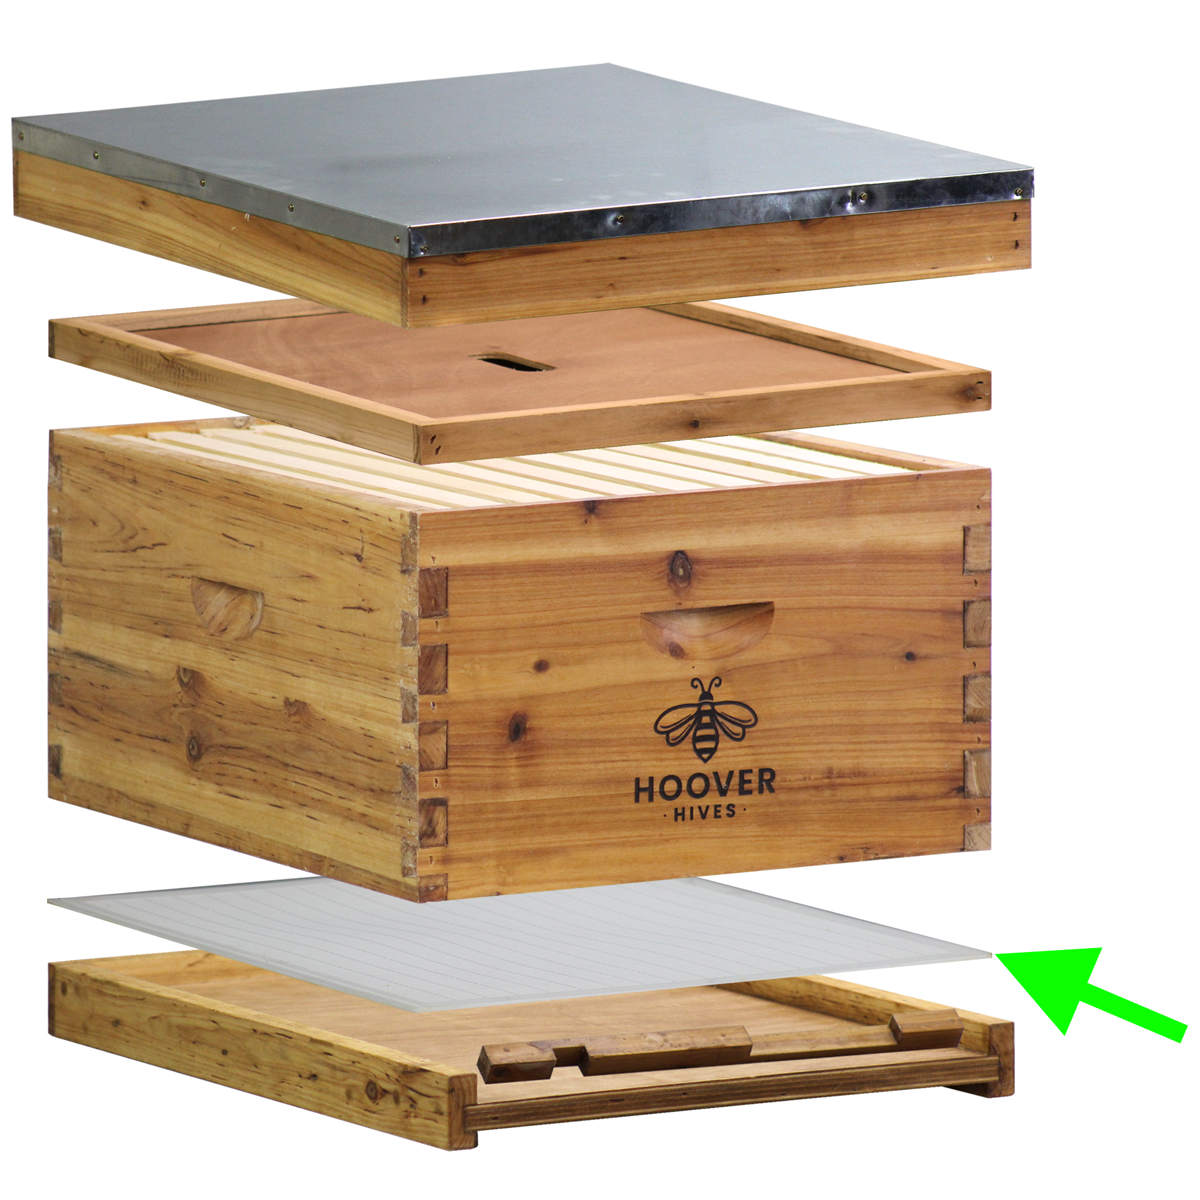
Change to Screened Bottom Board (Optional)
Screened bottom boards can help create a good amount of circulation that starts from the bottom of the hive. If you're looking at ventilation from the beekeeper's perspective we talked about earlier then it's likely you'd want to trade out your solid bottom board for a screened one.
Screened bottom boards can be especially great in states where the temperatures are extremely hot. Like opening a window on a hot day, they keep the inside of the hive cooler and prevent the bees from having to beard on the outside of the hive. This can create a more productive hive.
When bees beard, they are cooling down the hive by reducing the population on the inside. Bees like to have a constant temperature of 95 in the hive and so when it's hot outside, it can easily get hotter inside.

Below the screen is a slide in plastic board that will catch the varroa mites that fall. On this platform you can smear a little coconut oil, Crisco, or spray some pam on it. Doing so will have the Varroa Mite and Small Hive Beetles (SHB) stick to it. This allows you to count the mite drop rate and keep surveillance on how many pests you have in your hive.
Screened Vs Solid Bottom Boards
Pros to Screened Bottoms:
- Creates ventilation
- Prevents condensation
- Allows you to trap and monitor pests
- In hotter states, can make bees' lives easier by cooling down the hive
Cons to Screened Bottoms:
- In colder states, can make bees work harder at heating up the hive
- Can diffuse the pheromones of the hive and make communication more difficult
- Wind chill factors can freeze hives
- Can allow dew from grass to rise into hive

Hoover Hives Wax Coated Screened Bottom Board
Pros to Solid Bottoms:
- Keeps pheromones in the hive to make better communication
- From bee's perspective it is the closest to a natural hive
- Can prevent deadly wind chills from making their way into the hive
- Dual purpose, can be turned upside down to utilize built in mouse guard
- Can lead to earlier brood production
Cons to Solid Bottoms:
- In hotter states, can make bees work harder to cool down the hive
- Should be cleaned annually to prevent build up

Hoover Hives Wax Coated Solid Bottom Board
Receive New Bees (Optional)
The day has finally come! Your new bees are here!
As you already know from last year. Receiving your spring bees is a very exciting day.
One important thing to remember is to feed your bees sugar water when they arrive. Some packages don't have food sources for them and they're living on their honey within the frames. To easily feed them sugar water, put the syrup into a spray bottle and spray the mass of bees -- just don't spray them so much that you have soggy bees.
Also, please have your new beehive ordered, delivered and set up long before your new bees arrive. This can prevent a lot of headaches. The last thing you want is to have a bunch of bees, but nowhere to put them.
Here's a Pro Tip!
This last tip is from Galena Farms in our other article: What Good Are Queen Excluders? (Click Here).
This technique requires you to set up your hive in a little different way then you're probably used to.
Before putting your bees in the hive, you'll want to put the queen excluder that came with your hive at the bottom of your hive below their brood box, but above the bottom board (see picture). Putting a queen excluder here allows the worker bees to exit the hive and orient themselves to find pollen or nectar, but contains your queen inside the brood box. This can prevent your hive from swarming right away.
If you have a top entrance in your hive, you'll want to temporarily close this off too.
In a few days, your queen will start laying brood there. Once she's laying eggs, you know she's there to stay and you can remove the queen excluder.
In Conclusion
As you've learned here, second year beekeeping is full of unique challenges that revolve around timing.
The early spring inspection should be a quick check for signs of life and your queen, seeing if they'll survive on the food sources they have left, and deciding how to get a hold of new bees if you have to.
Mid spring means it's time for your first thorough inspection of the year. It involves counting your mites and starting your spring bees on a treatment regimen. Mid spring also has warm enough temperatures that you can start feeding them sugar water and giving them their meds.
Once the last frost date hits, you've completed your full first year of beekeeping and it opens up a variety of tasks you can perform. Mainly taking off the insulation and deciding how much ventilation you want to keep for the year. At this time you could also reverse hive bodies and receive your new bees.
I hope you put into practice much of what this article mentioned. Doing so will give you the greatest head start to second year beekeeping.
Good luck to you all!
Keep On Beekeeping On!
-Lane